

Easy Steps to Flip or Rotate an Image in PowerPoint | Tutorial
PowerPoint is a versatile tool that allows users to create visually appealing presentations. One useful feature it offers is the ability to manipulate images to suit your needs. Flipping an image in PowerPoint can be a valuable technique to format your slides and tailor your presentation to your needs. In this blog, I will guide you through the simple steps required to flip an image in PowerPoint, enabling you to change the design layout effortlessly.
If you're working on a new slide layout, explore our collection of PowerPoint templates for fresh, editable slide designs that make customizing visuals a breeze.
You will learn how about these PowerPoint Arrange options:
Flip Horizontal: This option flips the image along a vertical axis, effectively creating a mirror image. It is useful when you want to make a symmetrical or reversed version of the original image.
Flip Vertical: This option flips the image along a horizontal axis, resulting in an upside-down version of the original image. It can be helpful when you want to create a dramatic effect or change the image's perspective.
Rotate: We will look at multiple options for rotating.
🢂 Click here to view video instructions.
Follow these steps to flip an image
-
Step 1: Open PowerPoint and Insert an Image: Launch PowerPoint and open the presentation where you want to flip an image. I will be using this medical woman running from PresenterMedia.com graphic library.

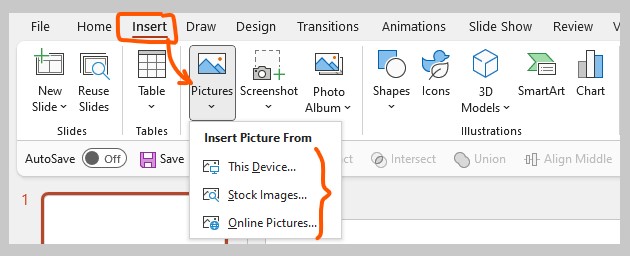
If you're starting a new presentation, create a blank slide to insert an image. Click the "Insert" tab on the top navigation bar and choose the "Picture" option. Select the desired image from your local storage or online sources, and click "Insert" to add it to your slide.
-
Step 2: Select the Image: You will notice that a border with adjustment handles appears around the image, indicating that it's selected.

-
Step 3: Access the Picture Format Options: First, select the image and navigate to the "Format" tab on the top navigation bar to access the picture formatting options. This tab contains various tools to modify the appearance of the selected image.

-
Step 4: Flip Image Horizontally or Vertically: Under the "Picture Format" tab, locate the "Arrange" group.
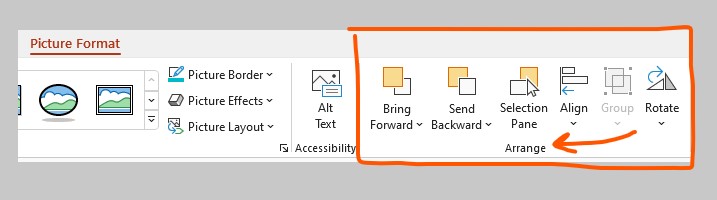
Within this group, you will find two buttons labeled "Rotate" and "Flip." Click on the "Flip" button to reveal a drop-down menu with two options: "Flip Horizontal" and "Flip Vertical."

Choose the appropriate flip option based on your requirements. You will notice the image flipping accordingly on your slide as soon as you click on either option.
-
Step 5: Adjust and Fine-Tune the Flipped Image (Optional): After flipping the image, consider making additional adjustments to ensure it fits perfectly within your slide. You can resize, crop, or reposition the image using the adjustment handles or the different formatting options available under the "Format" tab. These options allow you to refine the image's appearance and alignment according to your preferences.

-
Step 6: Save and Finalize Your Presentation: Once you are satisfied with the flipped image and have made any necessary adjustments, it's essential to save your presentation. Click on the "File" tab and choose the "Save" or "Save As" option to store your changes and ensure that your flipped image is preserved.

Customize a graphic and then flip it in PowerPoint.
Have you ever customized an animation or clipart with your message but wanted it to face the other direction? In this video tutorial, watch a unique trick to quickly get the text on the customized clipart to show in the right direction when flipped.
How to rotate an image in PowerPoint
To rotate an image in PowerPoint, follow these simple steps.
First, open the PowerPoint presentation and navigate to the slide containing the image you want to rotate. Select the image by clicking on it once. You should see small circular handles appear around the edges of the image.

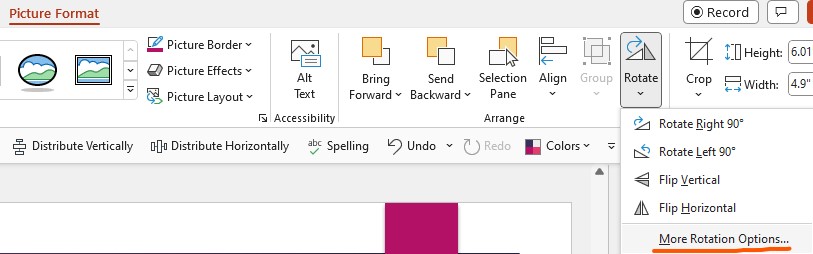
Next, click on the "Format" tab in the PowerPoint ribbon at the top of the screen. Look for the "Rotate" option in the "Arrange" group and click on the arrow next to it. A drop-down menu will appear with various rotation options. To rotate the image clockwise, choose "Rotate Right 90 degrees" or "Rotate Left 90 degrees" to rotate counterclockwise.
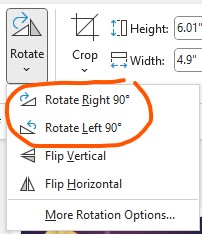
If you want a more precise way to rotate an image, you can click the little rotate arrow on the image selection.
![]()
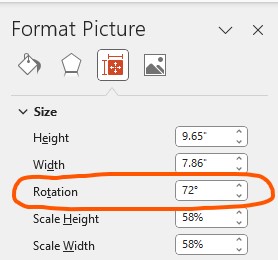
Or, go to Picture Format, and under the Rotate menu, select More Rotating Options.
Then, adjust the Rotation option by typing in a value or clicking the up and down arrows.
Flipping and rotating images in PowerPoint is a straightforward process that can significantly enhance the visual impact of your presentations. Following the simple steps outlined in this blog, you can effortlessly flip images horizontally or vertically, create mirror images, or change the perspective to suit your needs. Experiment with this technique to add creativity and uniqueness to your PowerPoint slides, making them more engaging and memorable for your audience.