
How to Create PowerPoint Templates Using Slide Masters
🆕 Blog updated October 2025: This article has been refreshed with the latest PowerPoint 365 interface updates and improved step-by-step instructions.
Updated for PowerPoint 365 and PowerPoint for the Web (2025), this step-by-step guide shows how to use Slide Masters to create branded presentation templates that save time and ensure consistent design. Whether you’re a business professional, educator, or designer, understanding Slide Masters in PowerPoint will help you build slides faster and maintain your brand’s look across every presentation.
What Are Slide Masters in PowerPoint?
Slide Masters serve as the main blueprint for your presentation’s design. They control the appearance of text, images, and colors for every slide layout. Editing a Slide Master automatically updates all slides that use it—helping maintain a cohesive visual identity across your entire deck. Whether you’re customizing a company-branded template or building slides for teaching, Slide Masters are the foundation of every professional PowerPoint presentation.
Quick Overview Video
Watch a quick overview of how to access the slide master and add a design. To see how to use the slide master to create a branded company PowerPoint template, see the in-depth video below. Watch an in-depth video at the end of this article.
Step-by-Step: How to Use Slide Masters in PowerPoint 365
1. Start a New Presentation and Choose Slide Size
Open a blank presentation in PowerPoint. On the Design tab, choose your desired dimensions and orientation. While 16:9 landscape is standard, you can create portrait or custom slide sizes to match your project or screen format.
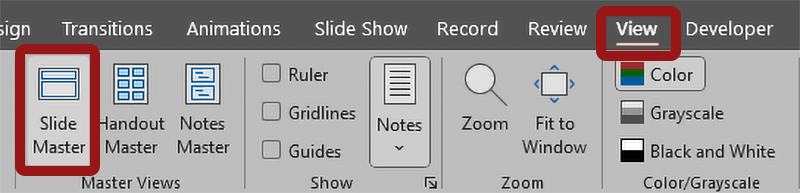
2. Access the Slide Master View
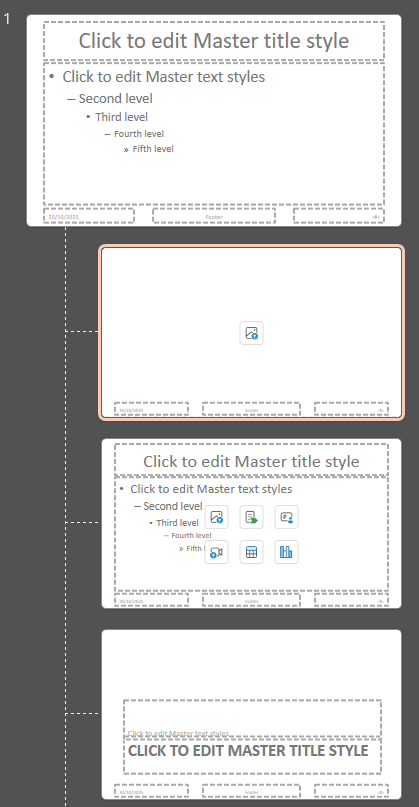
Next, click the View tab and select Slide Master. This option appears in the “Master Views” section. The left sidebar now displays a large slide at the top (your master) and smaller layouts below it. These layouts inherit design properties from the master, allowing consistent formatting across your presentation.
3. Edit the Master and Layout Slides
The top Slide Master controls your presentation’s global design. Layouts beneath it—such as Title Slide, Section Header, and Content Slide—each define different page types. When you make edits to the Slide Master (like updating a logo or background), every connected layout automatically adopts those updates.
Designing Your Custom PowerPoint Template
With Slide Master view open, you can design your entire presentation framework. On the Slide Master tab, you’ll find all the controls to define your look and feel. Here’s how to build a custom design:
- Apply a custom PowerPoint theme using the “Themes” dropdown.
- Change or customize your slide background.
- Add placeholders for text, images, charts, or videos.
- Reposition and resize placeholders for your layout needs.
- Remove unused placeholders to simplify the design.
- Adjust orientation and ratio under Slide Size → Custom Slide Size.
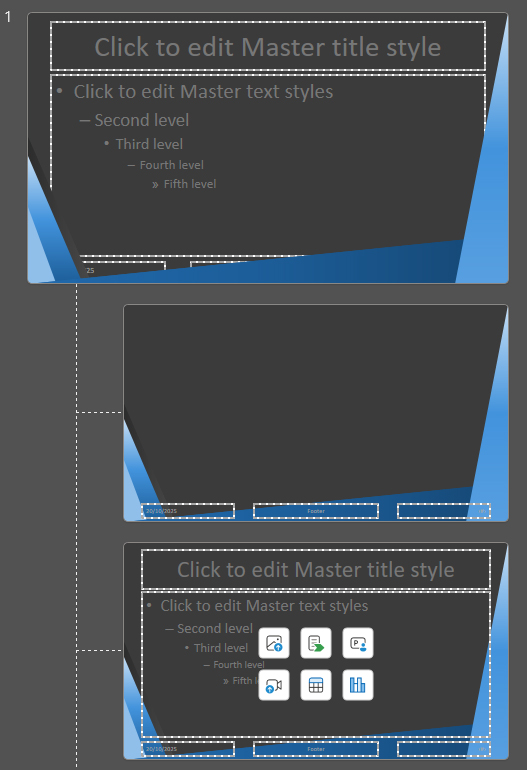
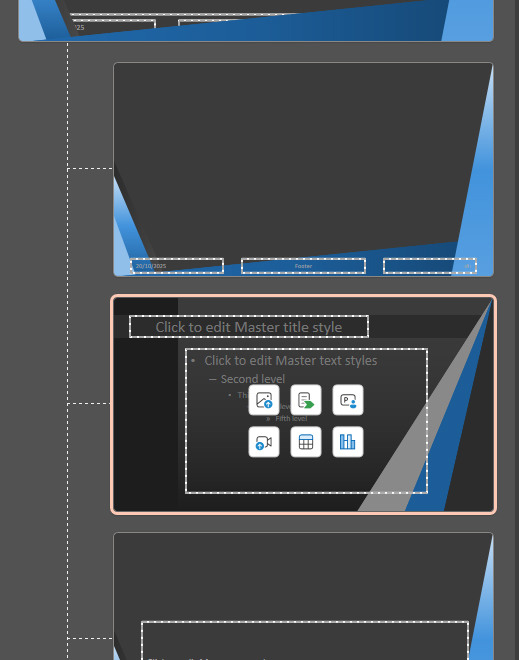
1. Adding a Design to the Parent Slide
In the example below, I copied the design elements from a PresenterMedia PowerPoint template and pasted it as the top "Parent" slide in the slide master, and you can see all the child slides took on the same design as the parent. You can do this with any of our professionally designed PowerPoint Templates.
2. Adding a Design to the Child Slide
Along with adding a design to the parent slide, you can also add a design to each child slide and move the placeholder text around to fit inside the design area.
3. Adding your logo to the slide master
While in Slide Master view, go to the Insert tab in the top menu and choose Pictures → This Device. Select your logo file and insert it onto the master slide. Once it appears, position the logo so it fits naturally within your parent slide’s design. This placement ensures the logo automatically appears on every child slide that inherits from the master. If you’ve customized an individual child slide with its own design, simply copy and paste the logo onto that layout as well, positioning it to align with the overall presentation style.
![]()
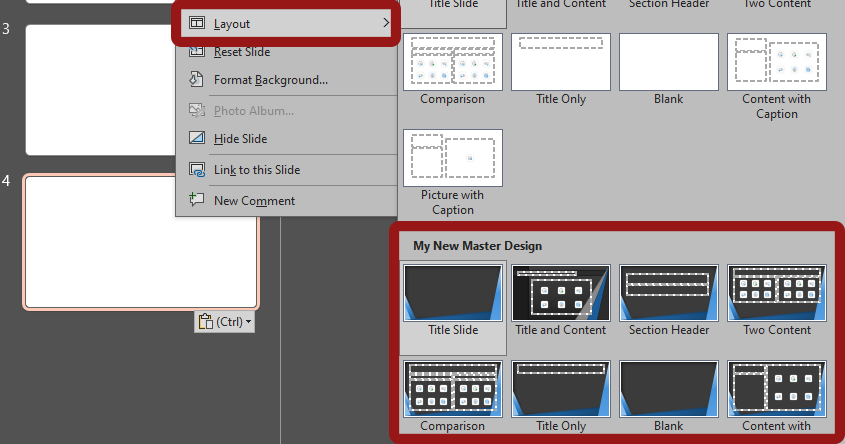
Choosing Slides from Your New Slide Master Layout
After you have your designs added to the slide master, you can close the slide master to return to the standard view. From here, you can add a slide or right-click on a slide and go to Layout, then choose the slide from your new slide masters. Doing this makes it easy to reuse the master layout to build a new presentation from this PowerPoint template you built in the slide master.
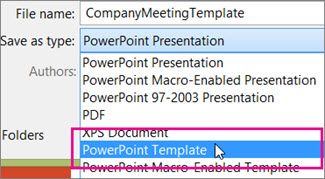
Saving Your PowerPoint Template
When your design is complete, go to File → Save As and choose PowerPoint Template (.potx) as the file type. PowerPoint automatically saves the file in your Custom Office Templates folder. You can now create new presentations from this template anytime, ensuring a polished, on-brand look.
Watch this tutorial explaining more about the slide master.
Common Mistakes to Avoid When Editing Slide Masters
Even experienced users make errors when building templates. Avoid these common pitfalls for smoother editing:
- Editing individual slides instead of the master: Changes made on normal slides won’t apply to new ones. Always make global changes in Slide Master view.
- Not checking all layouts: Some layouts, like Title Slides, might retain old fonts or colors if not updated manually.
- Saving as .pptx instead of .potx: Regular presentations don’t preserve master settings—use the template format instead.
- Overdesigning: Too many elements or heavy graphics can slow PowerPoint performance and distract from your message.
Tips for Creating Branded PowerPoint Templates
To design professional, reusable templates that align with your brand, follow these Slide Master design tips:
- Apply official brand colors and fonts: Set these under the “Variants → Colors” and “Fonts” menus for easy reuse.
- Add a logo only once: Place your logo on the master, not every layout.
- Keep it balanced: Use PowerPoint’s alignment tools to ensure even margins and spacing.
- Create reusable slide types: Include predesigned layouts for team bios, charts, or data graphics.
- Test in normal view: Always preview your slides before sharing to ensure proper formatting.
Why Slide Masters Still Matter in 2025
Despite the rise of AI-generated content, PowerPoint Slide Masters remain essential for design consistency and brand control. They ensure that presentations made by different team members all look unified. When paired with AI slide creation, they offer the best of both worlds: fast content generation and polished design standards.
Explore Ready-Made Templates
If you’d rather skip the manual setup, explore PresenterMedia’s PowerPoint templates. These ready-made designs can be customized instantly—change text, update colors, or add your own graphics in minutes. You can also enhance your presentation by combining them with PowerPoint animations and presentation clipart to make your slides more dynamic and engaging.
This article includes insights adapted from Microsoft’s official PowerPoint support page.
Frequently Asked Questions About PowerPoint Slide Masters
What is a Slide Master used for in PowerPoint?
A Slide Master defines the default design, layout, and font styles for all slides, ensuring a consistent professional look throughout your presentation.
How do I create a PowerPoint 365 template?
Open Slide Master view, design your layouts, and save your file as a PowerPoint Template (.potx). This ensures your settings apply to all future presentations.
Can I edit my PowerPoint template later?
Yes. Reopen your .potx file, adjust your Slide Masters, and re-save. This allows you to keep templates updated with brand or design changes.
Are Slide Masters compatible with AI presentation builders?
Yes. You can generate slides using AI tools like PresenterMedia’s AI Presentation Maker and then apply your own template design for consistent branding.
Can I use templates from PresenterMedia?
Absolutely. PresenterMedia offers thousands of PowerPoint templates that you can easily customize—add your text, insert graphics, and adjust colors quickly without starting from scratch.